UI Submodule
UI submodule has some helper functions to hide/show, set attribute/property like styling, detecting iframe load/unload etc.
Detecting when iframes have loaded and/or unloaded
Detecting iframe load and unload events is very straightforward through the help of the UI submodule functions onIframeLoaded and onIframeUnloaded.
Getting the iframe context name
The web component widgets, when mounted to the DOM, adds an iframe inside. The name of the iframe context is normally the name of the widget, but if you include the same widget more than once in the same page, the iframe name will have suffixes such as widget-name-0, widget-name-1.
For example, if you include the widget he-orderjourney-shorter multiple times on the same page:
- the first time, the iframe name will be
he-orderjourney-shorter - the second time, the iframe name will be
he-orderjourney-shorter-0. The suffix index starts at 0 - the third time, the iframe name will be
he-orderjourney-shorter-1
Detecting whether iframe has loaded
// version 4.1 added ability to dispose of events
const id = window.hapi.ui.service.onIframeLoaded((iframeName) => {
    console.log('HAPI Elements iframe with name has LOADED:', iframeName)
})

// later dispose of the listener to prevent memory leaks
window.hapi.removeEventById(id)
Detecting whether iframe has unloaded
// version 4.1 added ability to dispose of events
const id = window.hapi.ui.service.onIframeUnloaded((iframeName) => {
    console.log('HAPI Elements iframe with name has UNLOADED:', iframeName)
})

// later dispose of the listener to prevent memory leaks
window.hapi.removeEventById(id)
You should place the onIframeLoaded and onIframeUnloaded events in the hapi:load:script event otherwise because you are not explicitly removing these events, if you add these events again, the callback provided will run N times the amount of times you have added the listeners.
Example with hapi:load:script:
const centralStateManagement = {
    hasHapiElementsLoaded: false,
    loadedIframeNames: [],
}

window.addEventListener("hapi:load:script", () => {
    centralStateManagement.hasHapiElementsLoaded = true

    // version 4.1 added ability to dispose of events
    const onIframeLoadedId = window.hapi.ui.service.onIframeLoaded((iframeName) => {
        centralStateManagement.loadedIframeNames.push(iframeName)
    })

    // later dispose of the listener to prevent memory leaks
    window.hapi.removeEventById(onIframeLoadedId)

    // version 4.1 added ability to dispose of events
    const onIframeUnloadedId = window.hapi.ui.service.onIframeUnloaded((iframeName) => {
       centralStateManagement.loadedIframeNames = centralStateManagement
            .loadedIframeNames
            .filter(
                loadedIframeName => loadedIframeName !== iframeName
            )
    })
    // later dispose of the listener to prevent memory leaks
    window.hapi.removeEventById(onIframeUnloadedId)
})
Inspecting the iframe DOM
Let's consider you want to hide "Add to Campaign"/"Remove from Campaign" buttons. Most of the time, elements like these will have an id attribute which will contain some helper text to help you create your query selector.
First inspect the element you want to work with, within the iframe.
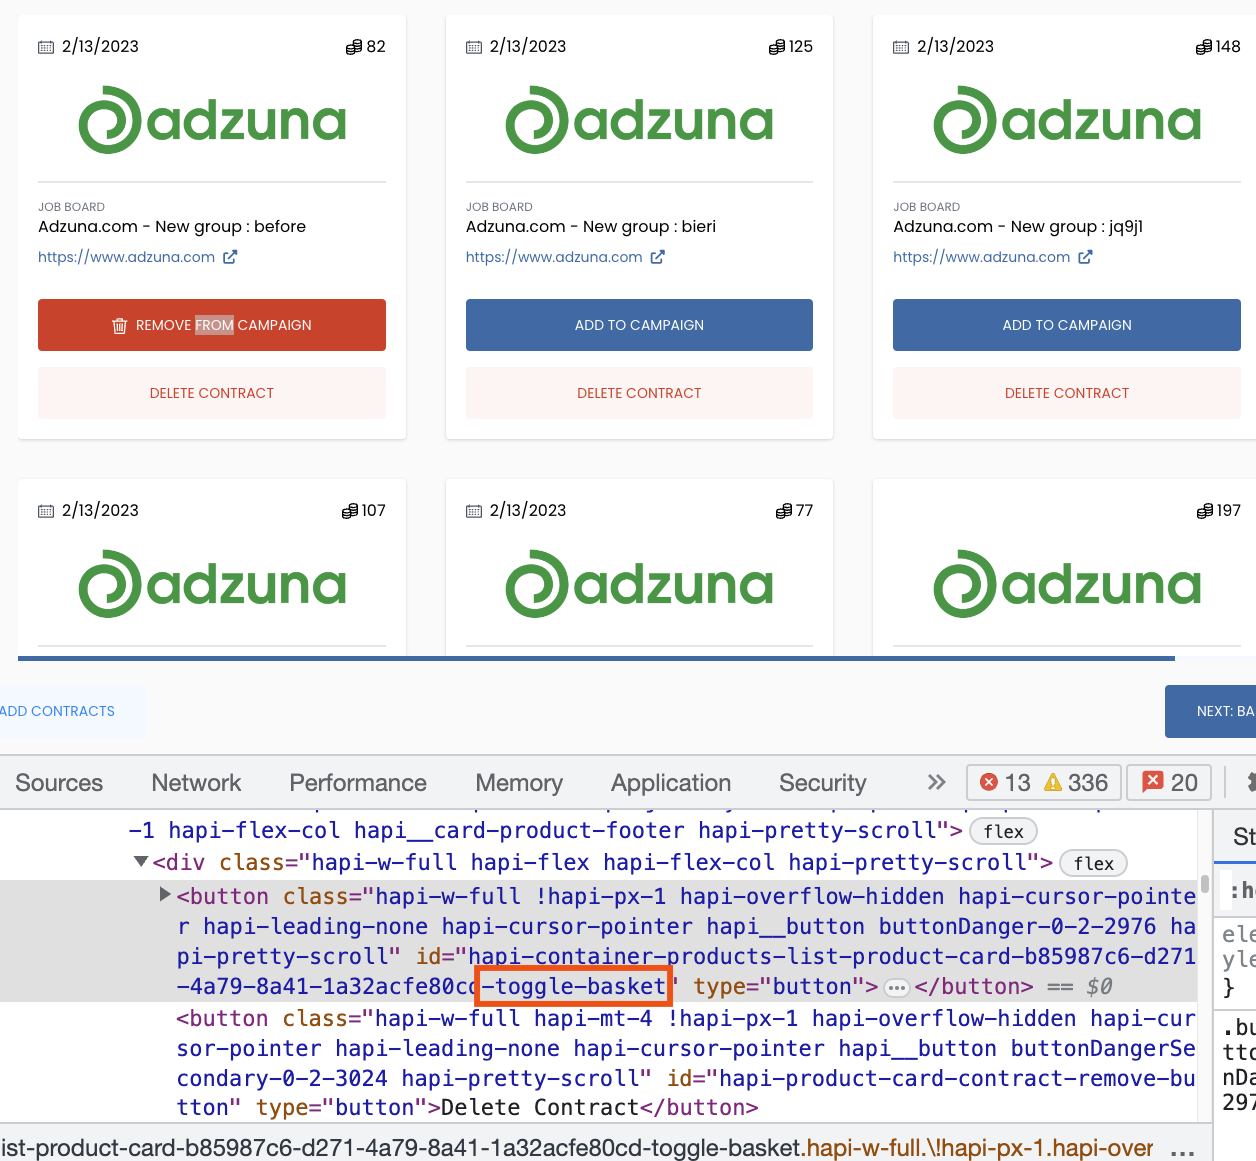
The button has a long id value in which there is a unique ID belonging to that particular product/contract; however we only care about the -toggle-basket part. We can query custom element attributes that are suffixed with -toggle-basket with this query selector: [id$=-toggle-basket].
Below example would change based on the HTML Element you want to take action upon. In the case of the basket toggle button, it is suffixed with -toggle-basket thus we use the CSS Attribute Selector id$=. For an HTML Element that has the ID id="some-prefixed-id-98asd9f898" you would want to use id^=some-prefixed-id. Please refer to CSS Attribute Selectors documentation for more complex use cases.
The following examples demonstrate how to hide and show elements:
Hiding an element with query selector
// version 4.1 added ability to dispose of events
const id = await window.hapi.ui.service.hideElement("[id$=-toggle-basket]")

// later dispose of the listener to prevent memory leaks
window.hapi.removeEventById(id)
hideElement actually adds an event listener so that when elements matching the query selector mounts to the DOM, they are hidden. This is to prevent race conditions where you try to hide an HTML Element but you can't because it has not been mounted to DOM yet.
showElement with same selector need to be used to bring the elements back when you are done hiding them so there are no unintended side effects.
Showing an element with query selector
// version 4.1 added ability to dispose of events
const id = await window.hapi.ui.service.showElement("[id$=-toggle-basket]")

// later dispose of the listener to prevent memory leaks
window.hapi.removeEventById(id)
Please note that this would also hide "Add to Campaign" button on the product page. Below example shows how to bring the buttons back when the steps change:
Depending on your use case, for example let's say you want to hide these buttons based on active order journey step, you can do:
// version 4.1 added ability to dispose of events
const id = window.hapi.orderJourney.state.stepActive.onChange(
    (step) => {
        switch (step.key) {
            case window.hapi.orderJourney.utils.stepKeys
                .selectContracts: {
                window.hapi.ui.service.hideElement(
                    "[id$=-toggle-basket]",
                )
                break
            }
            default: {
                window.hapi.ui.service.showElement(
                    "[id$=-toggle-basket]",
                )
                break
            }
        }
    },
)

// later dispose of the listener to prevent memory leaks
window.hapi.removeEventById(id)
showElement actually adds an event listener so that when elements matching the query selector mounts to the DOM, they are shown. This is to prevent race conditions where you try to show an HTML Element but you can't because it has not been mounted to DOM yet.
hideElement with same selector need to be used to hide the elements back when you are done showing them so there are no unintended side effects.
Setting styles of an element with query selector
Sometimes, the HAPI Elements JS API for Theming might not be enough. Because the elements are inside iframes, there is no native way to style an element however we provide an HAPI Elements JS API function so that you can still style a HTML Element that is inside an iframe:
const ourCustomStylesForToggleItemInBasketButton = {
    backgroundColor: "yellow",
    color: "black",
    borderRadius: "50px"
}

// version 4.1 added ability to dispose of events
const id = await window.hapi.ui.service.setStyle(
   "[id$=-toggle-basket]",
   ourCustomStylesForToggleItemInBasketButton,
)

// later dispose of the listener to prevent memory leaks
window.hapi.removeEventById(id)
setStyle actually adds an event listener so that when elements matching the query selector mounts to the DOM, their styles are updated. This is to prevent race conditions where you try to set style of an HTML Element but you can't because it has not been mounted to DOM yet.
Setting a particular style attribute of an element with query selector and the name of the style property
In addition to the UI Function Submodule function setStyle, you can also set the value of a particular style property:
const ourCustomBackgroundColorForToggleItemInBasketButton = "yellow"

// version 4.1 added ability to dispose of events
const id = await window.hapi.ui.service.setStyleAttribute(
   "[id$=-toggle-basket]",
   "background",
   ourCustomBackgroundColorForToggleItemInBasketButton,
)

// later dispose of the listener to prevent memory leaks
window.hapi.removeEventById(id)
setStyleAttribute actually adds an event listener so that when elements matching the query selector mounts to the DOM, their style property is updated. This is to prevent race conditions where you try to set style property of an HTML Element but you can't because it has not been mounted to DOM yet.
Adding and removing CSS classes of an element
HAPI Elements uses under the hood TailwindCSS which is a utility-based CSS framework. The CSS classes of TailwindCSS are prefixed with hapi-.
So for example:
mt-4becomeshapi-mt-4md:hiddenbecomesmd:hapi-hidden!px-3which adds!importantbecomes!hapi-px-3
You can add and remove these TailwindCSS classes applied to an HTML element using UI submodule's functions: addClass and removeClass. Examples are given below on how to use them.
Setting a particular attribute of an element with query selector and the name of the attribute and value of the attribute
In addition to the UI Function Submodule function setAttribute, you can also set the value of a particular attribute:
const attributeName = "disabled"
const attributeValue = "true"

// version 4.1 added ability to dispose of events
const id = await window.hapi.ui.service.setAttribute(
   "#user-journey-bar-next-button",
   attributeName,
    attributeValue
)

// later dispose of the listener to prevent memory leaks
window.hapi.removeEventById(id)
setAttribute actually adds an event listener so that when elements matching the query selector mounts to the DOM, their attribute is updated. This is to prevent race conditions where you try to set attribute of an HTML Element but you can't because it has not been mounted to DOM yet.
Adding a TailwindCSS class to an element with query selector
// version 4.1 added ability to dispose of events
const id = await window.hapi.ui.service.addClass(
   "[id$=-toggle-basket]",
   // prefixed with an exclamation mark so that it has !important added
   // depending on the element, the exclamation mark might not be needed
   "!hapi-bg-yellow-500"
)

// later dispose of the listener to prevent memory leaks
window.hapi.removeEventById(id)
addClass actually adds an event listener so that when elements matching the query selector mounts to the DOM, their class property is updated. This is to prevent race conditions where you try to add a class to an HTML Element but you can't because it has not been mounted to DOM yet.
Removing a TailwindCSS or CSS class from an element with query selector
// version 4.1 added ability to dispose of events
const id = await window.hapi.ui.service.removeClass(
   "[id$=-toggle-basket]",
   // you can only remove classes that are already applied to the element
   // if class is not found, it will ignore removeClass action
   "hapi-w-full",
)

// later dispose of the listener to prevent memory leaks
window.hapi.removeEventById(id)
removeClass actually adds an event listener so that when elements matching the query selector mounts to the DOM, their class property is updated. This is to prevent race conditions where you try to remove a class from an HTML Element but you can't because it has not been mounted to DOM yet.
Adding a custom stylesheet
Sometimes there are too many customizations to make thus the code may become unreadable. In such cases, you can add a custom stylesheet to the widgets using addStyleSheet:
const exampleStyleSheetStr = `
    .hapi__button {
        background-color: black !important;
    }
`

// version 4.1 added this function and the ability to dispose of events
const id = await window.hapi.ui.service.addStyleSheet(
    "example-id", // can be used to remove the stylesheet, see below
    exampleStyleSheetStr,
)

// later dispose of the listener to prevent memory leaks
window.hapi.removeEventById(id)
addStyleSheet actually adds an event listener so that when iframes load the stylesheet is added to the DOM. You don't need to worry about using onIframeLoaded or onIframeUnloaded
Removing an already added custom stylesheet
To remove an already added custom stylesheet, you should have the ID you passed to the addStyleSheet function then use removeStyleSheet:
await window.hapi.ui.service.removeStyleSheet(
    "example-id",
)
Appending and removing HTML Elements to a slot element
It is possible to add custom HTML elements and/or remove elements to/from a slot (different than hiding) using UI submodule appendChildToSlot and removeChildFromSlot functions. For certain areas, we have <slot></slot> elements that you can use to append and remove custom HTML Elements. To find the slots, you would inspect the DOM with the Developer Tools and get the id property of the slot then provide it to appendChildToSlot and removeChildFromSlot functions.
Appending a custom HTML Element to a slot element
const customButtonEl = document.createElement("button");
customButtonEl.id = "our-custom-id"; // useful when you want to remove it later
// you can add your own event listeners (please note that addEventListener will not work)
customButtonEl.onclick = () => { // there are no arguments returned
    console.log("Custom Button Clicked")
}
customButtonEl.innerHTML = "<b>Some Bold Text</b>"
const customButtonElStyles = {
    textTransform: "uppercase",
}
Object.entries(customButtonElStyles).forEach(([key, value]) => {
    customButtonEl.style.setProperty(key, value)
})

// version 4.1 added ability to dispose of events
const id = await window.hapi.ui.service.appendChildToSlot(
   "product-landing--before", //name of the slot
   customButtonEl, //your HTML Element
)

// later dispose of the listener to prevent memory leaks
window.hapi.removeEventById(id)
You can also add TailwindCSS classes to your custom elements:
customButtonEl.classList.add("hapi-p-4", "hapi-bg-red-500")
And also you can use the Global CSS variables mentioned in Theming and Fonts > Global Theming section however these CSS variables get rendered in kebab-case prefixed with --hapi-global-. Some examples:
--hapi-global-primary-background-color--hapi-global-accent-text-color
To utilize them in your custom component you would do:
customButtonEl.style.setProperty("background-color", "var(--hapi-global-primary-background-color)")
appendChildToSlot actually adds an event listener so that when elements matching the slot ID mounts to the DOM, the child is appended to the slot. This is to prevent race conditions where you try to add a custom HTML Element but you can't because slot has not been mounted to DOM yet.
Removing an HTML Element from a slot element
By default the slots will be empty until you add custom elements to them. Therefore there won't be HTML Elements to remove, unless you want to remove an element you have previously appended. Let's first append an element to the slot, then remove it:
const customButtonEl = document.createElement("button");
customButtonEl.id = "our-custom-id"; // useful when you want to remove it later
// you can add your own event listeners (please note that addEventListener will not work)
customButtonEl.onclick = () => { // there are no arguments returned
    console.log("Custom Button Clicked")
}
customButtonEl.innerHTML = "<b>Some Bold Text</b>"
const customButtonElStyles = {
    textTransform: "uppercase",
}
Object.entries(customButtonElStyles).forEach(([key, value]) => {
    customButtonEl.style.setProperty(key, value)
})

window.hapi.ui.service.appendChildToSlot(
   "product-landing--before", //name of the slot
   customButtonEl, //your HTML Element
)

// Remove custom element from the same slot
await window
    .hapi
    .ui
    .service
    .removeChildFromSlot(
        "product-landing--before",
        "#our-custom-id" // this argument is a query selector thus we have the hash/pound sign to select the ID
    )
Contrary to other UI submodule functions removeChildFromSlot does not add an event listener. Removing an element from a slot would depend on your business logic thus the moment you call this function, the existing element you added to the slot before gets removed.
Changing icons in the UI
Version 3.5 added the ability to change UI icons.
There are two kind of icon sets in HAPI Elements:
- VONQ SVG Icons
- Lottie Animated Icons
- You can find many Lottie icon repositories online, an example is LottieFiles
- Font Awesome Icons (only Free icons supported)
Inspecting DOM to find the icon name
Using Developer Tools > Elements tab, you should inspect the icon to find the CSS class.
Inspecting VONQ icon in DOM
VONQ Icons have these CSS classes added to them:
vonq__iconFor non-animated SVG iconsvonq__icon-animatedFor animated Lottie icons
We utilize BEM Naming Convention for custom CSS classes thus the name of the icon is also available as:
vonq__icon--NAMEOFICONINKEBABCASEvonq__icon-animated--NAMEOFICONINKEBABCASE
Here is an example:
![]()
Inspecting Font Awesome icon in DOM
Icons that are Font Awesome icons have fa-STYLEOFFONTAWESOME CSS class added to them. Name of the Font Awesome icon is prefixed with fa-.
Available Font Awesome styles are:
solidthusfa-solidregularthusfa-regularlightthusfa-lightthinthusfa-thinduotonethusfa-duotone
Here is an example:
![]()
Changing the icons
Now that you know the name and the type of the icon that you want to change, you can do the following after HAPI Elements has loaded:
Loading...
Controlling scroll position
Listening to scroll events
You can listen to scroll events using onScroll function:
const elementSelector = '.hapi__component-order-journey-order-review'
const eventType = 'scroll'
const domEventCallback = (data) => {
    console.log('domEventCallback', data)
}

// version 4.1 added ability to dispose of events
const id = await window.hapi.ui.service.onDOMEvent(
    elementSelector,
    eventType,
    domEventCallback
)

// later dispose of the listener to prevent memory leaks
window.hapi.removeEventById(id)
The allowed values for eventType can be found as HAPIDOMEventTriggeredEventType. The argument data in the callback can be found as HAPIDomEventTriggeredEventSerializable.
Getting scroll position
You can get scroll position using getScrollPosition function:
const iframeName = 'he-orderjourney-shorter' // for more info see /docs/javascript-api/ui/#getting-the-iframe-context-name
const elementSelector = '.hapi__component-order-journey-order-review'

const position = await window
    .hapi
    .ui
    .service
    .getScrollPosition(
        iframeName,
        elementSelector
)

console.log('getScrollPosition result', position)
The return type can be found as HAPIUIScrollPosition.
Setting scroll position
You can set scroll position using scrollTo function:
const iframeName = 'he-orderjourney-shorter' // for more info see /docs/javascript-api/ui/#getting-the-iframe-context-name
const elementSelector = '.hapi__component-order-journey-order-review'
const scrollToOptions = {
    top: 0 // accepted values can be found in https://developer.mozilla.org/en-US/docs/Web/API/Element/scrollTo
}

await window
    .hapi
    .ui
    .service
    .scrollTo(
        iframeName,
        elementSelector,
        scrollToOptions
)